Deploying AppleAutoPro Frontend and Backend with Docker Compose
🌟 Introduction
This tutorial will guide you through deploying the AppleAutoPro frontend and backend components quickly using Docker Compose.
🛠️ 1. Server Preparation
Using the aaPanel (Optional): If you need to manage multiple sites or services, it is recommended to install aaPanel and Nginx to simplify management.
📥 2. Download and Install
2.1 Choose the Installation Script Based on Server Location
Personal Edition Installation Command
bash <(curl -Ls https://raw.githubusercontent.com/SideCloudGroup/AppleAutoPro-Personal/refs/heads/v4/install_en.sh)Business Edition Installation Command
bash <(curl -Ls https://raw.githubusercontent.com/SideCloudGroup/AppleAutoPro-Business/refs/heads/v4/install_en.sh)⚙️ 3. Modify Configuration Files
3.1 Directory Structure Overview
dataDirectory: Stores program data files (e.g., databases). Regular backups are recommended.webDirectory: Stores frontend files.
3.2 Edit .env File
Fill in the necessary configuration information in the .env file:
- It is recommended to use strong random passwords for
MARIADB_ROOT_PASSWORDandMARIADB_PASSWORDto enhance security.
Other site settings can be configured via the admin panel after the program starts.
🌐 4. Configure Reverse Proxy
The program listens on port 18523 by default. Set up a reverse proxy to: http://localhost:18523. This port can be changed by editing the WEB_PORT field in the .env file.
💻 aaPanel Configuration Example
- Create a new site in the aaPanel, set the domain, and select
Staticfor thePHP version. - Go to site settings, find
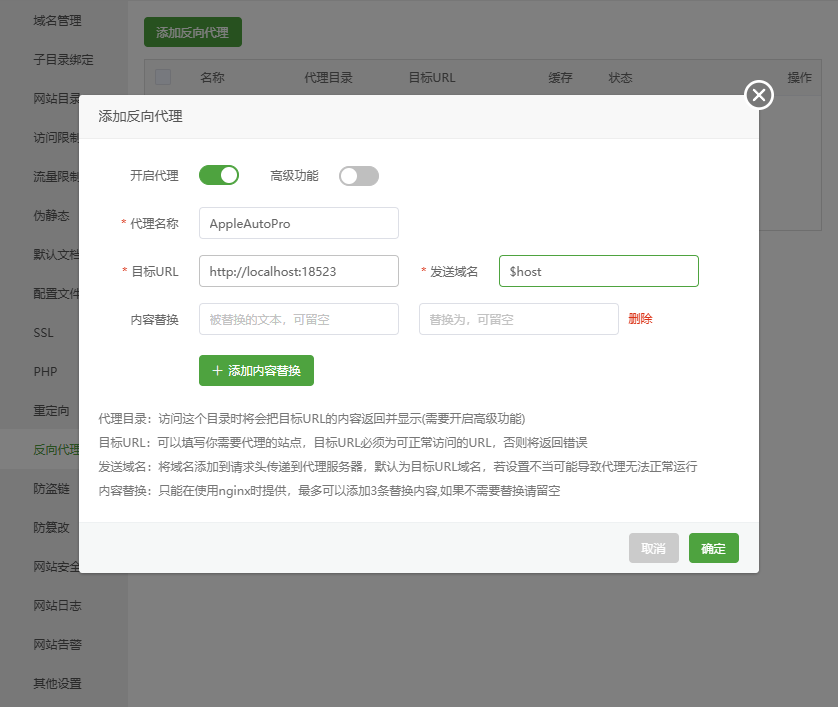
Reverse Proxy, and add the following rule:- Proxy Target:
http://localhost:18523 - Domain:
$host
- Proxy Target:
- Example configuration screenshot:
🚀 Caddy Reverse Proxy Configuration Example
- Open the
docker-compose.ymlfile and uncomment thecaddyservice while commenting out thenginxservice as follows:
  caddy:
    image: caddy:latest
    ports:
      - "80:80"
      - "443:443"
    volumes:
      - ./data/Caddyfile:/etc/caddy/Caddyfile
      - ./data/caddy/data:/data
      - ./data/caddy:/config
      - ./web:/var/www/html
    depends_on:
      php-fpm:
        condition: service_healthy
    networks:
      - appleautopro-network
    restart: always

  #  nginx:
  #    image: nginx:latest
  #    ports:
  #      - "127.0.0.1:${WEB_PORT}:80"
  #      - "[::1]:${WEB_PORT}:80"
  #    volumes:
  #      - ./data/nginx.conf:/etc/nginx/conf.d/default.conf:ro
  #      - ./web:/var/www/html
  #    depends_on:
  #      php-fpm:
  #        condition: service_healthy
  #    networks:
  #      - appleautopro-network
# restart: always- Open the
data/Caddyfilefile and fill in your email (for automatic SSL configuration) and domain.
🚀 5. Start the Service
Run the following command in the installation directory to start Docker containers:
docker compose up -dCheck if the containers are running properly:
docker compose ps -a🧑💻 6. Register Administrator Account
Run the following command to register an administrator account (adjust the container name as needed):
docker compose exec php-fpm php think register <email> <username> <password>⚠️ Note: Angle brackets (<>) indicate placeholders; do not include them in actual commands.
✅ 7. Log In and Complete Configuration
- Log in to the admin panel using the newly created administrator account.
- Go to
Admin Panel→System Settingsto complete basic site settings.
🎉 Congratulations! AppleAutoPro has been successfully deployed!
Docker Compose Common Commands
Here are some commonly used Docker Compose commands to help you manage AppleAutoPro services:
- Start services:
docker compose up -d- View backend logs (for troubleshooting task execution, unlock failures, etc.):
docker compose logs backendTo follow output in real time, add -f:
docker compose logs -f backend- Shut down the project (stop and remove containers and networks):
Run in the installation directory:
docker compose downThis command does not delete data in directories such as data and web; the database and configuration files are preserved. To start again, run docker compose up -d.
- View service status:
docker compose ps -a💾 Data Backup and Recovery
To ensure data security, it is recommended to backup the database regularly. AppleAutoPro provides multiple backup and recovery methods.
For detailed backup and recovery instructions, please refer to: Data Backup and Recovery