Email Unlock and Rescue Email Auto-Management
This guide will help you configure Postal to enable AppleAutoPro email unlock and rescue email auto-management features.
⚠️ Important: Some domains may not be supported by Apple. We recommend that you manually attempt to add a rescue email using your custom domain in the Apple account management page before binding it to the system. If you can successfully add it, then proceed with the subsequent binding operations.
Feature Overview
The Rescue Email Auto-Management feature can:
- Automatically receive and process unlock emails from Apple
- Automatically manage account rescue emails
- No need to change your Apple ID email to a custom domain email
Configuration Options
| Mode | Best for | Postal setup |
|---|---|---|
| Option 1: Global email unlock | Multi-user sites; must be configured by the site owner in the admin panel | One site-wide Webhook |
| Option 2: Per-user custom domain | Users with their own rescue domain | One Webhook per user |
Global mode is unrelated to outbound mail settings under System Settings → Email. It is only used to receive unlock and verification emails from Apple.
Prerequisites
If you do not have a Postal account yet, you can use the Postal service provided by SideCloud.
Whether you use Option 1 or Option 2, you need:
- A Postal account
- The rescue-mail domain hosted on Postal, with domain verification and DNS (including MX) completed per the official Postal documentation.
- A Webhook URL in AppleAutoPro for Postal forwarding:
- Option 1: The site owner obtains the Global Webhook URL under Admin Panel → System Settings → Email Unlock
- Option 2: The email unlock link from User Center / Profile
Option 1: Global Email Unlock (Recommended)
Global email unlock can only be configured by the site owner (under System Settings in the admin panel). Regular users cannot enable or change global settings.
After the site owner completes Postal and admin setup, users who have not set a custom rescue domain in their profile can use site-wide email unlock without configuring Postal themselves.
Site Owner Setup
The following steps require logging in as the site owner / administrator:
- Go to Admin Panel → System Settings → Email Unlock.
- Enable Enable global email unlock.
- Set Global rescue email domain (e.g.
mail.example.com, withouthttp://or@), and ensure MX records point to Postal. - After saving, copy the Global Webhook URL shown on the page.
- Configure Postal using Postal setup steps below, using the global Webhook URL as the Endpoint URL (one Endpoint and Route for the whole site).
⚠️ Security: Webhook credential leakage affects the entire site. If you Regenerate Webhook credential, the old URL stops working and Postal must be updated with the new URL.
End Users
After the site owner has enabled global email unlock:
- No need to set a rescue domain or personal email unlock link in the user dashboard.
- Enable Rescue Email Auto-Management on accounts in Account Management (batch operations supported).
- If a user sets their own rescue email root domain in the profile, they switch to Option 2 and must configure a personal Webhook.
Option 2: Per-User Custom Domain
For users who need a dedicated rescue domain. After meeting the prerequisites above, use your personal email unlock link to configure Postal forwarding (one Webhook per user).
Postal Setup Steps
In the Postal admin panel, navigate to:
📌 Routing → HTTP Endpoints → Create new Endpoint
Configuration Parameters:
- NAME: Can be anything (descriptive names are recommended)
- URL:
- Option 1 (global): Use the Global Webhook URL from System Settings → Email Unlock in the admin panel
- Option 2 (per-user): Get the email unlock link from User Center / Profile in AppleAutoPro
- Other Settings: Keep the defaults
- Save: Click Create HTTP Endpoint to create the endpoint
📌 Example: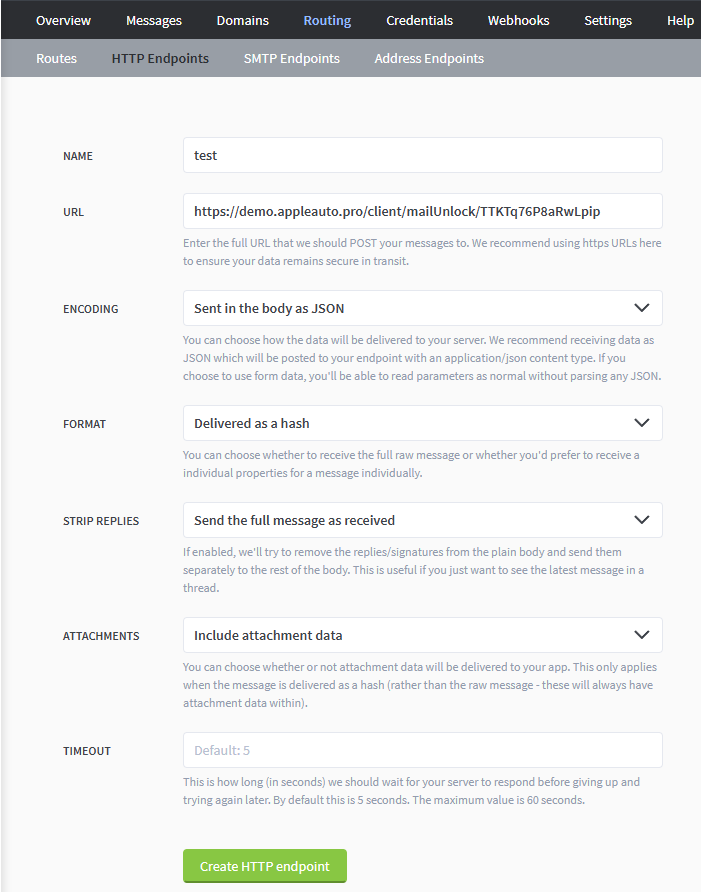
In the Postal admin panel, navigate to:
📌 Routing → Routes → Create new Route
Configuration Parameters:
- NAME: You can enter
*(wildcard, applies to all incoming emails) - @: Select your domain
- ENDPOINT: Choose the HTTP Endpoint you just created
- Other Settings: Keep the defaults
- Save: Click Create Route to save the rule
📌 Example: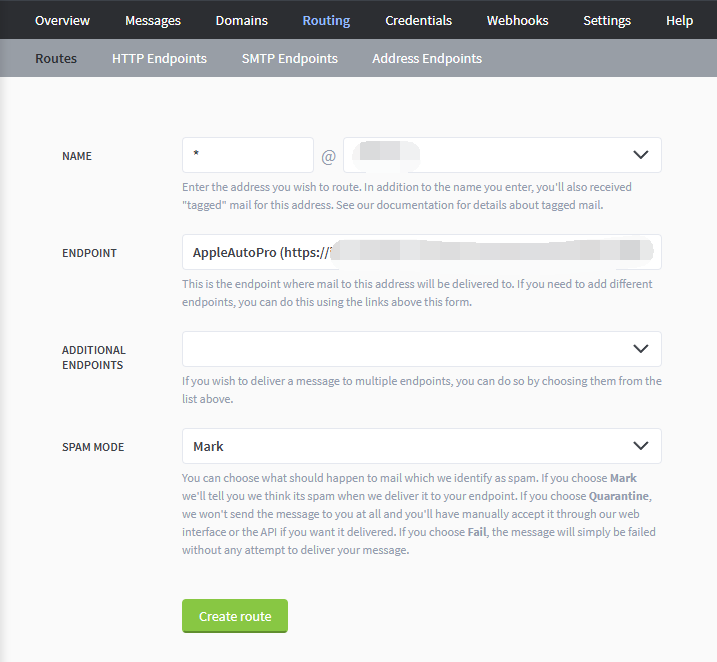
Enable Rescue Email Auto-Management
After completing the email configuration, in the AppleAutoPro account management page:
- Find the account that needs the feature enabled
- Enable "Rescue Email Auto-Management"
The system will automatically set the rescue email for the account, no manual operation required.
💡 Tip: You can also use the batch operation feature in the account management page to enable this feature for multiple accounts at once.
🎉 Configuration Complete!
Your account has now successfully enabled the Email Unlock and Rescue Email Auto-Management features.
Notes
- No need to change your Apple ID email to a custom domain email
- The system will automatically receive and process unlock emails from Apple
- Rescue emails will be automatically managed without manual intervention
- In global mode, the whole site shares one Postal Webhook; users with their own rescue domain must use a personal Webhook